We unbox the Gigabyte Z170X Gaming G1

Showing posts with label sahin. Show all posts
Showing posts with label sahin. Show all posts
Tuesday, 28 June 2016

Thursday, 26 July 2012
Gigabyte Osmium & Krypton Gaming Gear!
Up now are two of Gigabyte’s latest gaming peripherals, the Krypton mouse and the Osmium mechanical keyboard. As always Gigabyte like to name their equipment weird science fiction titles.
- Interface: USB
- Tracking system: Advanced Gaming Laser Sensor
- Resolution: Real 8200dpi
- FPS(Frame rate per second): 12000 frames/second
- Maximum acceleration: 30g
- Maximum speed: 150 inches/ second
- Switch Life: 10 million times
- Onboard memory: 32KB GHOST™ Macro Engine
- Certificate: CE/ FCC/ BSMI/KCC
- Cable Length: 1.8m nylon braided / Gold-plated USB connector
- Dimension: (L)128.0*(W)67.0*(H)41.5 mm
- Weight: 110g ~149g adjustable
- Accessory: Weight Adjustment Case(includes 10 weights)/ Metal Weight Removal Device/ interchangeable Mouse Chassis(Speed+Control) / Spare Teflon Feet Pads
- Support OS: Windows XP/ Vista/ Windows 7

The mouse comes in quite an elegant package; however it is very unfriendly if you’re the type who likes to keep their packaging nice and tidy. You literally have to rip off the external cardboard print wraparound to get to the actual units box.
 Lifting the cover off reveals the mouse just sitting there in its plastic case. The inner roof of the lid is protected with black hard foam. Lifting the mouse out reveals the bottom half which contains a small case for the CD and a larger box with a lid which contains the added accessories like weights, mouse base plate and a little tweezer-like picker used to move around the weights (a somewhat useless addition).
 The mouse comes with a feature which allows you to change the bottom of it depending on which surface you’re on to allow for smooth mouse operation. By default it comes with the standard 'Control Base' which utilizes an ultra smooth Teflon foundation found in literally every other high performance mouse. You'll also find a 'Speed base' which features an abrasion free ceramic foundation focused on quick movements and immediate reaction.
 There is also the option to put in weights in the mouse in a more specific way. There are weight slots along the back and down the sides as well, so if you like a bit of weight on the sides of the mouse, this will come as a big feature for you! Basically it allows you to shift the center of gravity of the mouse to suit your gaming style.
The mouse is ambidextrous and features a button on the mouse which automatically switches the profile to suit the left hand, pretty nifty! There are enough lighting effects on the mouse to keep any sleep deprived gamer entertained for minutes on end.
 The mouse looks all cool and comes with plenty of features but unfortunately performance wise, I could never get used to it. It just did not sit on my hands comfortably wether I clawed or palm gripped it. It just did not feel right in my hands no matter how long I tried for. I think it may have been a matter of hand size though. I’m guessing here that small handed users might find it more comfortable to use than some of us other larger handed gentlemen.
Overall though the mouse is not too bad, yes it was outrageously uncomfortable for me but should be pretty good for many others.
Mouthful of words indeed it is. Let’s take a look at the list of its features:
- Interface: USB 2.0
- Activation: Cherry Red Mechanical Switch
- Switch life: 50 million times
- Key Profile: Standard
- Travel distance: 4mm to the bottom
- Pre-travel: 2mm to actuation point
- Peak force: 45g
- USB Hub: USB3.0 + USB2.0
- Report Rate: 1000Hz
- Audio: Microphone-in/ Earphone-out
- Weight: 1500g ±10%
- Dimension: 454(L)* 257(W)*45(H) mm
- Cable length: 2.0m ±10%
- Colour: Black

 Let's have a look at some of the keyboards main features:
* Superior Cherry MX Mechanical Key-switch
* Supports USB 3.0 SuperSpeed (Via Motherboard)
* Absoloute Anti-Ghosting Multi-Key Press capability
* 45g Key Force
Now, this is a mechanical USB2 keyboard but features a USB3.0 hub. Basically you need to connect the USB2.0 cable coming from the keyboard to any port and the USB3.0 cable defined by the blue socket connector to a USB3.0 port which purely acts as a pass through for the USB slot on the keyboard. This allows you to use the USB port on the keyboard at full potential speeds. In regards to the cabling, one negative is the fact the cables are all braided together. So basically coming out of the keyboard you have one thick cable which branches out to 2x USB cables, and 2x audio jack cables, A bit unnecessary as many people will just be using one of the cables.
 Looking at the keyboard, it is a pretty one! There are G keys along the top which are programmable within the software with two rollers which control the key light brightness of the backlit keys and a volume controller. A quick note about the backlit keys, they are BRIGHT! They are the brightest I’ve seen in any keyboard and are simply awesome. So bright they are it actually glows out and illuminate the sides of the keys giving off an amazing effect. On the right hand side there is also a lit Aivia logo which also doubles up as a button. When pushed it changes the colour of the logo and also switches any profiles you have set up. Each profile is colour coded allowing you to stay in control of your keyboard and know what you have active.
The keyboard is a breeze to use. The Cherry MX keys are very comfortable to use and is lightning quick to react! I’m really impressed with this one as I’m not too much of a fan of mechanical keyboards. It is a bit loud but I’m told by others it is quieter than ones they’ve played with and are impressed by the sound on it, clearly i am nitpicking a bit. The supplied wrist rest is durable and a solid piece of plastic. it easily attaches and detaches so you don't need to sit their for a period of time trying to take it off or on.

Overall i am impressed with the keyboard. The previous Aivia's were a bit of a let down with their build quality and overall design but it seems like Gigabyte have learned and learnt fast! I'd expect many gamers to be impressed with the Osmium and would forward to future Gigabyte gaming peripherals!
sahin.s@centrecom.com.au
Wednesday, 11 July 2012
Thermaltake Level 10 GT Battle Edition Case
 So Thermaltake have created a case that has quite the long name. Some may say a bit too long and i'd have to agree. I mean when someone asks you what case you have, by the time you say 'I have a Thermaltake Level 10 GT Battle Edition', the other person would have already snoozed off.
 So the first striking thing about this case is its colour. It's green. Now, one might find the green all monstrous and somewhat Hulk like which would be a slightly fair point. The case is definitely big, but where the Hulk excels in strength is where the Level 10 GT fails. The case is pretty lightweight which is from the plastic made shell. Looking at the design, it would've been magical if Thermaltake added steel parts to it. All the green parts are all plastic and is a massive let down. Even the handle up on the top is plastic and even had some issues with the way it is placed. The corners of it jagged out of line which diminished the smooth complete look of the handle.
 Moving down the case gets you to the hard drive area. You'll find yourself 5 bays which i believe are meant to resemble rockets or bullets (correct me here people). A push of the button beside the numbering unlocks the cage and allows for it to be pulled out. Be aware though, once you pull it out you cannot unsee what lays before you. You'll find yourself holding a pretty ugly green plastic case. What makes this a bit more of an issue than other plastic holders is the larger area covered by plastic. It disappoints me really to see Thermaltake design a drive mount with so little thought.
  Personally i am quite a fan of Thermaltake and have owned/own all their Xaser series cases which have amazing design ideas put into them, so when i see something that i feel is going backwards, it really does let you down. Looking around the cage however you will find some interesting illustrations and instructions for the hot-swappable bay which definitely lifts the overall army feel of the case, a nifty little touch! The overall colour could have used a bit more work though. I would've liked to have seen either a better green colour or some army camouflage. The plain green colour is very different from usually but doesn't have a very strong aspect to it.

 Sure, standing out is always a good thing, but i guess what all people would want to know is its performance and practicality. Just note, the case comes locked so you can't open it till you find the keys which are subtly located at the back. Once you remove the keys (read the manual for this one) you can get to unlocking the side panel. Opening the door reveals the mounted fan with directional flaps and the roomy but somewhat enclosed motherboard area. The drive area is pretty well closed off besides a few holes. It does mean it would look good for people who like to show off their rigs. You have a nice complete isolated area to work with. The grommets on the Level 10 are very firm and are probably the best quality grommets i've come across. I've had a lot of cases in the past where the grommets would easily come off, and if you've experienced this you'd know how much of an effort and struggle it is to put them back on, so the Level 10 gets a big plus for it's cable management system. Opening the rear reveals more of the Level 10's fantastic cable management system. Most cables are pre-tied and ready to be plugged in. Sure you may need to change a few cables around and you can easily do it with the Level 10. One problem i did kind of have is trying to trace the cabling back to its source so if you do plan on rewiring some of the cabling, be prepared. The drive bay is interesting. It's all hot-swappable-like where you plug the drives into pre-built mounts and attached the cables to the mounted ports. The power ports come with a special made 5-port cable with an extension at the end of it. Now, this could cause a problem and make things worse and here's why.
  When plugging in a hard drive, you are going to run a SATA line anyway (which typically has 4 ports on it) so creating something like this means you need to find somewhere else to hide the extra power ports on the cable, whereas if you'd ran the whole cable directly to the mounted ports you could tuck the extras into the empty drive bays. Another issue is line amperage on PSU's. Unless you have a 1200watt+ PSU chances are a single SATA power rail isn't going to supply enough amperage to power 5 hard drives through the one cable.
 The case does come with 3-led fans which have their speed control and light switch on top of the case. The fans aren't too bright but the airflow in them was surprisingly good and you'll find it provides very good cooling solution. Long graphic card owners beware though, there isn't too much space in there for long graphics cards. The GTX690 for example at first glance does not look like it would fit in. There isn't much you can do either. The drive cage is locked into place and unmovable.
Overall, the case is pretty good. Regular LANners would love the ease of carrying this around with its handle and large windowed area and plenty of fan space allows for great cooling. This really is a solid gaming machine. Sure, it does have a few flaws including the a bit steep price tag but it offers the owner something special and unique. It gets my Silver Best Choice award for a few reasons, 1, It's uniquely designed, 2, it has the 'cool'factor, 3, Solid cooling at no extra cost.

By Sahin Selvi
sahin.s@centrecom.com.au
sahin.s@centrecom.com.au
The benchmark results may differ from user to user depending on what background software you are running and versions of benchmark software. These results aren’t portrayed to be seen as exact performance figures but merely as a rough estimate on the performance of the machine. These results are in no way bias to any company or person and are here to provide the end user in depth details and to provide extra assistance of potential purchases. All information on this page is subject to copyright. Please do not copy any parts of this article.
Thursday, 17 May 2012
Asus G75VW Laptop Review!
 Following the amazing G74, Asus have come out with the
latest addition their uber leet (and uber pricey) G series laptops, the G75!
Following the amazing G74, Asus have come out with the
latest addition their uber leet (and uber pricey) G series laptops, the G75!
So as always, let’s take a look at this monster’s internals.

 Model: G75VW-T1013V
OS: Windows 7 Home Premium 64bit
CPU: Intel® Core™ i7-3610QM (2.3GHz, 3.3GHz Turbo)
Memory: 16GB DDR3 (1600MHz)
Hard Drive(s): 256GB SSD + 1TB 5400RPM
Optical Drive(s): BluRay Writer
Networking: Gigabit Ethernet
Graphics: nVidia GTX670M 3GB
Display: 17.3” Full-HD LED (1920x1080 Resolution)
Audio: Sonic Master with Subwoofer built-in
Coms: 802.11b/g/n, Bluetooth 4.0
Inputs: 4x USB3.0, 1x Microphone, SD Card Reader
Outputs: 1x Headphone Out, 1x VGA, 1x HDMI, 1x mini Display Port
Battery: 8 Cell
Weight: 4.5kg
 Comparing with the G74 we see the processor upgraded to the
latest Ivy Bridge mobile quad core, RAM speed increased to 1600MHz, a GTX670M
graphic processor (Don’t be fooled, it is based on the Fermi architecture, not
Kepler) and a change in its audio processor. The G74 featured EAX audio while
the G75’s has been changed to something called ‘Sonic Master’. Not sure yet
whether or not that is a upgrade or a downgrade.
Comparing with the G74 we see the processor upgraded to the
latest Ivy Bridge mobile quad core, RAM speed increased to 1600MHz, a GTX670M
graphic processor (Don’t be fooled, it is based on the Fermi architecture, not
Kepler) and a change in its audio processor. The G74 featured EAX audio while
the G75’s has been changed to something called ‘Sonic Master’. Not sure yet
whether or not that is a upgrade or a downgrade.
Last time I was pretty unimpressed with the packaging as it
just lacked any fine detail or definition, however it seems as though Asus have
listening and crafted a much more appealing internal layout. Removing the unit
out of its slick packaging felt a bit heavier than the G74 and rightly so
weighing in at 4.5kg, definitely not a ‘portable’ machine. The unit is almost
covered in rubber padding from the outer lid the palm rest of the keyboard.
Opening up the lid reveals the full sized backlit keyboard
and keys with a dedicated number pad. The keys feel great to type on and use while
keeping the ergonomics uncompromised. Along the top right of the unit you’ll
see the power button and the ROG button, which allow you to select difference
performance profiles for the machine. For testing purposes, I kept it on
Performance (Highest setting)

The sides of the unit are showered with all your inputs and
outputs including 4 USB3.0 ports. Asus have skipped the slower USB2.0
altogether and probably the wisest thing to do.
 Flipping the unit upside down we can unscrew a few places
off. I noticed a small screwed area towards the rear of the unit and taking off
the plastic revealed a small blower fan. Now, I’m not too sure about this but I
assume it is there to allow you to remove the plate when gaming for lengthy
periods to allow for better airflow. It would also be very beneficial if you
have a notebook cooler. The flow of air would create great thermal results.
Another larger panel once removed reveals the memory and drive slots similar to
those on the G74. Good upgradable laptop to have on hand.
Flipping the unit upside down we can unscrew a few places
off. I noticed a small screwed area towards the rear of the unit and taking off
the plastic revealed a small blower fan. Now, I’m not too sure about this but I
assume it is there to allow you to remove the plate when gaming for lengthy
periods to allow for better airflow. It would also be very beneficial if you
have a notebook cooler. The flow of air would create great thermal results.
Another larger panel once removed reveals the memory and drive slots similar to
those on the G74. Good upgradable laptop to have on hand. The display on the machine is fantastic and almost is
identical to that on the G74 with the matte finish. I would be surprised if it
was even a different screen altogether. The sound on the G75 is a bit better
than the G74. The small subwoofer on the bottom of the unit, though lacks any
punch, helps reduce that little bit of tinny sounds that come from laptop
speakers and add a punch, as minuscule as the punch might be.
The display on the machine is fantastic and almost is
identical to that on the G74 with the matte finish. I would be surprised if it
was even a different screen altogether. The sound on the G75 is a bit better
than the G74. The small subwoofer on the bottom of the unit, though lacks any
punch, helps reduce that little bit of tinny sounds that come from laptop
speakers and add a punch, as minuscule as the punch might be.
Performance
The G75 is put simply the fastest laptop I have used. It boots up in a blitz and performs day to day tasks like browsing, emails, light Photoshop work and other tasks an absolute breeze, and it does it quietly and with style. The G series always had amazing thermal performance and the G75 is no less. Even with the higher end parts which theoretically should be slightly warmer, the rear end exhausts do an amazing job in getting that heat out.
The G75 is put simply the fastest laptop I have used. It boots up in a blitz and performs day to day tasks like browsing, emails, light Photoshop work and other tasks an absolute breeze, and it does it quietly and with style. The G series always had amazing thermal performance and the G75 is no less. Even with the higher end parts which theoretically should be slightly warmer, the rear end exhausts do an amazing job in getting that heat out.
Starting up 3DMark11 I tested the machine under Performance
and Extreme settings with results as follows:
X963 3DMarks
P3001 3DMarks
X963 3DMarks
P3001 3DMarks
Overall, that is quite an impressive result. It managed to
score around 300 extra points on Xtreme and almost 1000 more under the
performance setting. That’s quite a big leap if you ask me for a laptop!
In our Unigine V2.5 benchmark, the G75 once again proved why
it is worth the upgrade:
FPS: 22.5
Score: 567
Min FPS: 6.9
Score: 567
Min FPS: 6.9
With the heavy benchmarks out the way, it was time to test
the unit under real world uses, gaming and boy was it awesome! At no point in
time did I feel like it struggled, it just simply and easily breezed through my
games and delivered exceptional results! Let’s take a look at some of the
details:
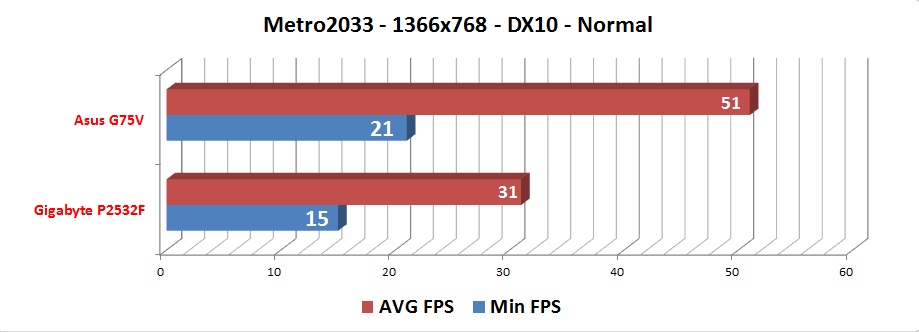


Temperatures were amazing. Even under full load the GPU
didn’t pass 70 degrees with the CPU coming in even lower. The exhausts at the
back however were pushing out a good amount of heat so full credit goes to this
design by Asus, the dual fan design they have in the machine definitely gets
the heat out. Having said that I would not recommend using this on your lap,
this will burn the hair of your legs! A desk and even if you have one, an
elevated cooler would be the wisest option.
Conclusion
the G74 was something (and still is in my opinion) special, the G75 is even better. It’s faster and what more does it need to be? It simply performs the way you want it too, however all good things have that little tick that could be removed, and in this case once again it’s Asus partitioned the 2 disks into 4 separate drives. I would assume many people would agree with me when I say nobody enjoys that. It’s unnecessary and quite frankly most people simply remove the partitions when they first get it and do a clean installation to remove the crapware that comes with. I mean let’s face it, this is targeted at heavy end gamers who are 80% of the time well aware of everything computer related and know exactly what they need and want in their systems. Asus provides only the internals while falling short on the software side of things with its crapware.
the G74 was something (and still is in my opinion) special, the G75 is even better. It’s faster and what more does it need to be? It simply performs the way you want it too, however all good things have that little tick that could be removed, and in this case once again it’s Asus partitioned the 2 disks into 4 separate drives. I would assume many people would agree with me when I say nobody enjoys that. It’s unnecessary and quite frankly most people simply remove the partitions when they first get it and do a clean installation to remove the crapware that comes with. I mean let’s face it, this is targeted at heavy end gamers who are 80% of the time well aware of everything computer related and know exactly what they need and want in their systems. Asus provides only the internals while falling short on the software side of things with its crapware.
 Having said that a simply uninstallation of it all will fix
any issues. Whether you do or don’t doesn’t change the fact this is a
marvellous machine! If I had 2k to blow on a system, I’d get a G75.
Having said that a simply uninstallation of it all will fix
any issues. Whether you do or don’t doesn’t change the fact this is a
marvellous machine! If I had 2k to blow on a system, I’d get a G75.sahin.s@centrecom.com.au
Thursday, 26 April 2012
Fractal R3 & Fractal XL Overview!

 Fractal are gaining great favourism from the PC community for its solidly built and elegant cases. So i thought i'd open up a few and take a closer look to see what the big fuss was about and if it really lived up to the hype.
The Fractal XL
Let's first take a look at its spec sheet:
Cooling system
- 2x 140mm fans (one 140mm included, one optional) with removable and washable filters, in the front. Recommended for intake of air.
- 1x 120mm fan optional with removable and washable filter, in the front. Recommended for intake of air.
- 1x 180mm fan included in the top of the case. Recommended for exhaust of air.
- 1x 140mm fan included in the rear of the case. Recommended for exhaust of air.
- 1x 120/140mm fan optional in the side of the case. Recommended for intake of air.

Specifications
- 4x 5,25" bays, 1x 5,25" to 3,5" converter included
- Mini-itx, micro ATX, ATX and E-ATX motherboards
- 10x HDD trays. 4x HDD trays in the HDD cage in the main chamber. This HDD cage is removable and rotatable.(Space ~330mm with HDD Cage and without ~480mm) 6x HDD trays in the lower HDD chamber. These HDD cages are fixed.
- A total of two 140mm fans and one 180mm fan included. Front 140mm fans are mounted with removable, washable filter. A fan controller is included, for mounting in one of the rear expansion slots.
- Pre-fitted with dense noise absorbing material in both side panels.
- ModuVent™ feature, allowing the user to choose between an optimal low noise level, having the cover mounted or optimal airflow by removing the cover and mounting a fan for intake.
- Maximum PSU length: Supports PSU's with a depth of maximum circa 180mm
- Maximum Graphic Card lenght: Supports graphic card lengths up to 330mm when removable HDD-Bay is in place
- Maximum CPU cooler height: Supports CPU coolers with height of 180mm
- Expansion slots: 7+1
- On top of front panel: 2x USB 2.0, 2x USB 3.0 and Audio I/O
- Case size (WxHxD): 232x560x561.3mm
- Net weight: 17.95kg


 The XL is your full sized ATX case and as expected the case is pure elegance. Slick corners coupled with soundproof material which makes this case a must for those looking for a truly silent computer set up. Most of its internal walls is covered with sound insulating pads, which in some places is removable to install optional fans. But they have done it so well that you don't have to remove an entire sheet of insulated padding. Instead they have already precut the padding to perfectly sit in the place of a potential fan. all you gotta do is remove the screws and the padding slips straight off. The case provides many of these spots to add in extra fans.
Looking around the insides i must say the build up of its build quality was seriously lacking. few of the edges had the metal sticking out, the hard drives moulds had bent handles and the side panel was distorted and didn't fit in perfectly with the rest of the case.
The Fractal R3
 Cooling system
- Fan controller for 3 fans included
- 1 rear Fractal Design 120mm @ 1350rpm included
- 1 front Fractal Design 120mm @ 1350rpm included
- 1 front 120mm fan (optional)
- 1 bottom 120mm/140mm fan (optional)
- 1 side panel 120mm/140mm fan (optional)
- 2 top 120mm/140mm fan (optional)

Specifications
- 8x 3,5 inch HDD trays, compatible with SSD
- 2x 5,25 inch bays, with 1x 5,25>3,5 inch converter included
- On top of front panel: 2x USB 2.0, 1x USB 3.0 and Audio I/O
- No PSU included (removable filter below PSU)
- M/B compatibility: Mini ITX, Micro ATX and ATX
- 7x expansion slots with sleek white painted brackets
- Supports graphic card lengths up to ~290mm
- Supports CPU coolers with height of ~165mm
- Supports PSU's with a depth of maximum circa 170mm, when using bottom 120/140mm fan location. When not using the bottom 120/140mm fan location, the case supports also longer PSU's, typically 200-220mm.
- Case size (WxHxD): 207.40x442x521.2mm
- Net weight: 12.50kg


This mid sized tower is almost identical to its full sized counterpart, the XL. The interior is reshuffled a bit to fit in the smaller area but almost packs the same punch as t he XL. Yet again however the quality in its build was lacking. It suffered the same issues with the XL with its distorted panels, dodgy hard drive caddies and bent edges. It's hard to think these things would have happened during transit because both cases fit very snuggle in thick foam padding.
Overall, even though they do lack that fine touch, they are quite nice cases and those looking for silence will really appreciate the insulated interior. Sound insulation pads are generally quite expensive so getting a case with such things already built into the case with such elegance, is a big big bonus!
sahin.s@centrecom.com.au
Tuesday, 3 April 2012
NZXT Switch 810 Overview!
 NZXT have released quite a few eye turning cases lately and the Switch 810 is the latest. You may have seen it being displayed around the internet, so I took one up to the office to take a closer look at what the fuss is all about.
http://www.centrecom.com.au/catalog/nzxt-switch-white-p-56602.html?sort=2a
The Switch 810 comes in a large black box safely guarded by foam moulds on the back and front of the case. However unlike the black box it comes in, the case is covered in pure white, so white that I’d be afraid to take this case anywhere but keep it in my office. We all know white things love distressing us by displaying all the nasty scratches and marks on a nice flat white surface. The positive is that dust won’t be as recognizable which does have its drawbacks as you’ll be blind to all the build-up of the particles that love to build up in your precious machine!


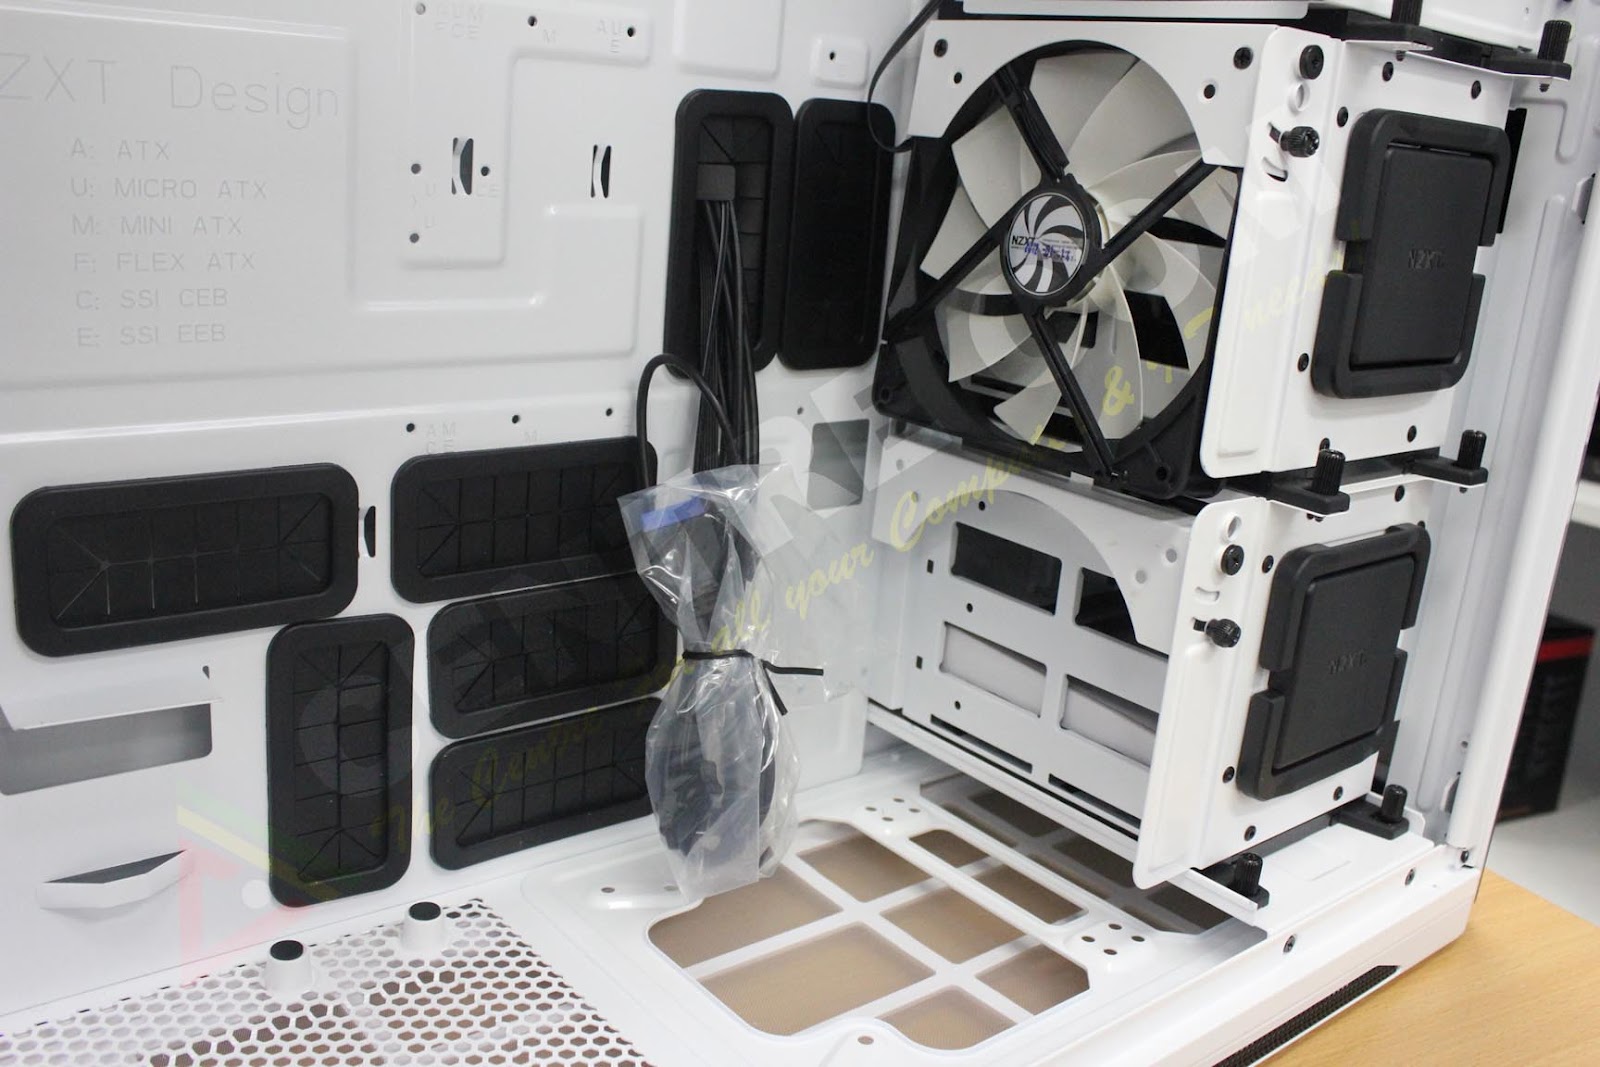


 Looking at the unit I was a bit worried about the build quality and I wasn’t wrong. The case does feature a fair amount of overhanging plastic that feels wobbly and a bit flaky, a disgruntling feature which will be noticeable while fiddling with the top of the case. Its top is where this case loses majority of its points. It features spaced out grids to promote airflow from the single supplied fan (supports up to 3 fans, or a water cooling black in the provided area), so why did they add the ability to completely close off the top to disable airflow altogether? If you install 3 fans on the slot above, why would you go and close off the top? And it’s not like the air will have any other place to go as there are no other ventilation slots apart from the top gaps.
 Time to look at its internals. After fiddling with the screw-lock combination which is ridiculously designed and executed poorly, the extra-large windowed panel reveals pure white elegance and simplicity in its design. The case has plenty of holes to thread your cables through, yet not providing adequate space between the motherboard tray and the side panel. The space is as thick as my middle finger and first impressions give me the feeling that the motherboard power cable would either be ridiculously tight, or if you have an Enermax power supply which features both motherboard power cables in one thick cable would probably not fit.
 The 5.25” bays provide a simple single hot pluggable bay which can be used to swap in and out your extra storage drive, or to house your SSD. The 3.5” bays are divided equally into two removable bays which are fantastic as it allows you to access the front panel to install extra fans, or even remove an entire bay all together and provide more room for airflow. The top bay features an angle adjustable fan which will blow straight onto your graphics card, which would provide multi card users with a great flow of air. Oh, don’t forget the fact that this case is very water cooler friendly and is almost built purely for water cooling enthusiasts. So don’t be afraid if you were pondering if this case is ready for intricate water cooling setups.
Overall, this case should be attractive to those who would like to setup a nice simple and clean looking case in their study/office. While it does lack from a good solid design, if it isn’t going to be going anywhere then it doesn’t really matter, does it?
By Sahin Selvi
sahin.s@centrecom.com.au
sahin.s@centrecom.com.au
The benchmark results may differ from user to user depending on what background software you are running and versions of benchmark software. These results aren’t portrayed to be seen as exact performance figures but merely as a rough estimate on the performance of the machine. These results are in no way bias to any company or person and are here to provide the end user in depth details and to provide extra assistance of potential purchases. All information on this page is subject to copyright. Please do not copy any parts of this article.
Subscribe to:
Posts (Atom)